Search This Blog

Sunday, 19 July 2009

BTGG2 - Khazars vs Arab Conquest

We're back! So here we go Beyond the Golden Gate game 2. Khazars (Jack) versus the Arab Conquest (me). Both very heavy on the horsemen, Jack's plan was to have a big left flank of Cavalry & Light Horse. Whilst he centre had the Khazar Hordes, Arty & The 'Beg' in his War Wagon. I matched the Khazars with Cavalry & Warband. My left would comprise Light Horse, Bow & Warband.

________________________________
Da Battle Plan
________________________________
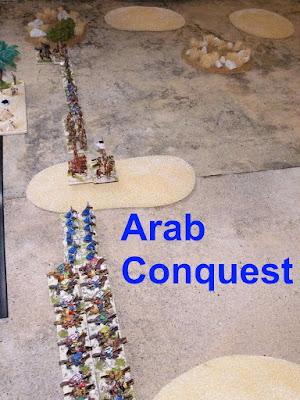
The Armies on the start line.
________________________________
Arab Cavalry ready to pounce.

________________________________
The 'Beg' & his War Wagon, Artillery and Hordes.

________________________________
Khazar Light Horse race along the flank.

________________________________
Arab slingers race for the rough.

________________________________
Khazar Light Horse clash with Arab Cavalry, advantage to the Khazars.

________________________________
The foot troops are far, far behind...

________________________________
It's one - nil to the Khazars....

________________________________
Plan of attacks at this stage.

________________________________
The Arab Cavalry now match the Khazar Light Horse.

________________________________
Now the Arabs press the advantage.

________________________________
New round and again the Khazars are forced back.

________________________________
Big Scrap coming up on this flank...

________________________________
The Khazar foot are slow to advance.

________________________________
I commit the Arab General & his bodyguard, hopefully they'll outflank the Khazar attack.

________________________________
The 'Faithful' get ready to engage....

________________________________
One day they'll arrive...

________________________________
Ha! Advantage to Jack, he manages to get the Khazar Cavalry to attack the Arab flank.

________________________________
Elsewhere it's an even match up.

________________________________
After many rounds of combat, finally some casualties.

________________________________
The Arab Warband get stuck in...

________________________________
Jacks die rolling is spot on, another Arab Casualty.

________________________________
The Arab line starts to 'bulge', will Jack be successful?

________________________________
At last a turning point, the Arab Horse fight back.

________________________________
No No Jack, Arab Cavalry versus Khazar Psiloi, a poor match up for him.

________________________________
On the extreme Arab Right Flank, I finally get the advantage.

________________________________
The foot troops are about to clash... Hoorar!

________________________________
Jack presses again, another Arab casualty.

________________________________
2 Arab Cavalry versus 1 Khazar Light Horse, come on!

________________________________
Arab Warband swamp the Khazar Cavalry.

________________________________
On the Arab left flank, Jack finally mobilizes his Light Horse, I just give ground.

________________________________
Yes, the Arabs are winning, Jack gives ground now.

________________________________
Lucky, Jack's Khazar Light Horse escapes....

________________________________
The Arabs close in for the kill....

________________________________
Whoops, I'd better get the Arab Light Horse back.

________________________________
Oh... It's looking good for the Arabs!

________________________________
No, Jack won't get through there...

________________________________
The Khazar Hordes launch an attack...

________________________________
The whole Khazar Cavalry are recoiled, victory must come soon!

________________________________
The Arab Warband take out a Khazar Horde!

________________________________
Jack's had enough, on his turn high PiP dice and everyone is piled in!
BISH! Down goes a Arab Light Horse....

________________________________
BOSH! The Khazar Hordes gang up on a poor Arab Psiloi.

________________________________
BASH! Khazar Psiloi wipe out some Arab Cavalry.

________________________________
However most of the Cavalry are forced back!
Jack deliberately leaves the Cavalry on the end of the line for the last combat....

________________________________
It's a bad position for him, if he's forced back it's game over....

________________________________
NO NO NO NO NOOOOOO! The dice are rolled, Jack doubles my score....
Off he goes arms aloft, running round the room, uttering victory chants.
My die reaches the stratosphere as I throw it out of the window. boo hoo

________________________________
Final positions......

________________________________
He's pulled off another victory, but that was very very close! That final round was a corker.
A good Cavalry scrap, however we both should of waited for the foot troops to get involved. If I get to play the Khazars next, then everyone is staying in line with the 'Beg'.

Friday, 12 June 2009

HITT WW1 British vs Turks - Attack on Beni Baloo

Right, straight after our Byzantine vs Sassanids game (click on the link below for a peek),
http://mrfarrow2udba.blogspot.com/2009/06/btgg1-byzantines-vs-sassanids.html
we re-arranged the table, threw on some scenary & came up with a crafty game for HITT.

Middle East 1916, the Turks have been halted and now the British are on the attack. A small rail stop named 'Beni Baloo' has been fortified by the Turk. A modest sized British force has been sent to send Johnny Turk packing....

The British (Jack) would be the attacker & have a third more points than the Turk (yours truly). However the Turks would have a nice amount of Trenches & Barbed Wire. A Road/Rail track dominated the field. Beni Baloo was represented by a few buldings. To the British left, a few small hills were situated. While on the British right, two large areas of rough aided the Turkish defence.

We used HITT version 1 rules (I still haven't printed out version 2, sorry Bad Lad I know), the British would make use of an Aeroplane & some Armoured Cars. Looking at the rules, we think that Armoured Cars can't shoot (Are Tanks the same?), we don't like this so we've upped the point cost by 1 & given AC's a range of 4". The British would also have two Generals & so two PiP dice, the Turks just one. This was because we felt the British forces were too big for just one General. Anything else we encountered, then we would just make up as we went along...

We normally just play lost elements for victory, but we'll give points system a try. In this case Victory is achieved if a third of the enemy is destroyed (I know HOTT says half..)

The British consisted of 2 x Generals, 1 x Aeroplane, 2 x AC's, 12 x Rifles,
3 xMg's, 3 x Artillery, 4 x Cavalry = 64 points (Break at 21)

The Turks consisted of 1 x General, 3 x Artillery, 3 x MG's, 10 x Rifles
= 43 points (Break at 14) (The Turks had some Transport Wagons = 0 points though)

On we go with the battle....
________________________________
Beni Baloo & the Turkish Defences.

________________________________
British Right Flank

________________________________
British left Flank, Jack's plan would feature a strong attack on this side.

________________________________
Overall Battlefield View.

________________________________
The Turkish defences from both sides....

________________________________
Onwards!!!

________________________________
Indian Infantry advances...

________________________________
KaBOOM!!! The British Artillery is spot on, scratch one Turkish Rifles.

________________________________
A new turn & it's double sixes....
'TALLY HO' Ginger.... in his crate, screaches through the Sky!!

________________________________
The British Cavalry heads straight for the Turks...

________________________________
....but are sent packing.

________________________________
'BOOOMM!' Ginger is spot on, Scratch one Turkish Artillery.

________________________________
But fierce, small arms fire makes Ginger bank sharply...

________________________________
The Turks are fighting hard.... The British Cavalry are sent packing again.

________________________________
Poor PiPs and the Indians are left without Orders!!

________________________________
The British Infantry are through the wire.

________________________________
The Armoured Cars finally catch up to the Cavalry.

________________________________
GINGER's bought it!!
The Turkish Machine Gunners shoot him down, cheers ring out along the trenches!

________________________________
The British assault goes in, the Turks give ground.

________________________________
At last, the Turks give ground on the British left.
Fire from the AC's & Lances from the Cavalry.....

________________________________
It's a hard scrap in the trench.

________________________________
Fire from the Turkish MG & the Armoured Car is sent reeling....
DBA charts are consulted & the 'ruling on the battlefield' is.... scratch one Rifle element!!

________________________________
The Brits are kicked out of the trench.

________________________________
Turkish Artillery fire, holds up the Cavalry - But it can't stop everything.

________________________________
The British Infantry get ready to attack the weak point.

________________________________
View from the Turkish trench.

________________________________
The Turks cut down some more Brits....

________________________________
Good shooting from the Turkish Artillery, but still not 88mm efficiency!

________________________________
Ginger's crate is burning and the deadly Turks cut down some Infantry.

________________________________
British Artillery starts to find their target.

________________________________
The state of the battle at this point, the British left is pressing hard.
The Indians on the right have sat down & having a cup of tea.
British casualties are mounting, could the Turks pull off a brilliant victory?

________________________________
Jack's getting frustrated, the Turks are putting up a stiff resistance.

________________________________
ATTACK!! ATTACK!! ATTACK!!

________________________________
Another round & they get set to try again....

________________________________
Another attack goes in!

________________________________
The poor Infantry are mown down.

________________________________
Turkish Infantry are cut down...

________________________________
The tide begins to turn, The turks loose TWO elements!!

________________________________
Jack's on a roll now!

________________________________
The Turkish Gunners fight on, it's very close!

________________________________
Numbers count, the Turks are being overrun....

________________________________
Jack's bloodlust is up, if it moves......

________________________________
CHHAAARRGGEE!!!

________________________________
Give'Em the STEEL!! British troops doing what they do well.
The Turks in the trench are beaten.

________________________________
It's all over now!! Down go the heroic Turkish Gunners.
At least the British AC is repulsed....

________________________________
BOO HiSS BOO

________________________________
Poor Show from the Indians!

________________________________
Final view of the British Left.

________________________________

Well that was close, a British Victory but with very heavy losses. The Aeroplane was fun, but it didn't last long. We liked the Armoured Cars, though they're a bit slow. Artillery performed better.... Must try Mortars in the next game, they could enhance the Assaults!